Peanut Butter Mousse

I am sorry but this recipe is addicting. Luckily I found a way to slim it down so you can enjoy it with out the guilt. Its fluffy, sweet and the peanut butter flavor make it a dream come true.

1 1/2 plus 1 Tbs Cups Skim Milk
1 Packet Sugar Free and Fat Free Vanilla Pudding Mix
1 Container Lite Cool Whip Defrosted
3 Tbs Peanut Butter

Start by combining peanut butter in a small bowl with 1 Tbs Min and mix well to soften. In a large mixing bowl combine milk and pudding mix whisking together. Once combined add peanut butter and continue to mix well, until pudding comes together and firms up. Now fold in Cool Whip one cup at a time. Place everything in the fridge and allow to cool. Enjoy!

20130429-090536.jpg

Pistachio Ambrosia Salad

This recipe is to good to be fat free and low in sugar. I know I had something like this before but never tried to make it. I love pudding so anything the can kick it up a step is worth it. This wonderful green color would be great for a St. Patty Day Treat or Easter Dessert. You could also use a vanilla or butter scotch pudding with some food color to change it for any holiday. Orange pudding and chocolate chips could be fun for Halloween. Have fun with this one and enjoy.

Ingredients:

1 20 Oz Can Crushed Pineapple in Light Syrup

1 20 Oz Can Pineapple Chucks in Light Syrup

1 Box Sugar Free, Fat Free Jell-O Instant Pistachio Pudding Mix

1 Cup Mini Marshmallow

1 Cup Softened Fat Free Cool-Whip

¼ Cup Unsweetened Coconut Flakes

Place canned fruit in a large bowl and drain most of the liquid away. Add pudding and mix well for a minute. Now add marshmallows and Cool-Whip and continue to fold together. Add the coconut and mix it all to combine. Place in the fridge and allow to firm up for an hour. Serve cold with a little extra coconut to garnish.

20130425-122102.jpg

Fruit Salad Roll Up

Shopping at the Italian Market can really play tricks on me. I make it a point not to bring a lot of money with me but I still tend to over do it. I got home and had an insane amount of fruit. All super colorful and fresh. I wanted to make a fun snack and this is what I came up with. Its like a fruit filled spring roll. The colors are so great that it makes a great presentation.

Ingredients:

4 Rice Papers

1 Kiwi

1 Banana

1/3 Cup Blue Berries

The first thing is to prepare the fruit. I started by slicing the kiwi into rounds and then each slice in half. The banana I cut in long vertical strips. The berries I kept the same. Next I places one rice paper in warm water for a few seconds to help loosen it up. Then I place the paper flat on the table and on one end I place on piece of the banana across, top it with a layer of kiwi, then a few blue berries. Now just roll it all up tightly and place on a plate. Repeat with remaining fruit. I served with a simple yogurt and peanut butter sauce.

Try using any fun fruit you have on hand. Make sure its colorful and that the textures are various. I think strawberries would be a great addition.

20130401-132246.jpg

20130401-132313.jpg

Heroset

I grew up eating this stuff by the bucket. Being from upstate New York I have a true love for apples in any form. Heroset is a Jewish apple dish created as a sweet spread for Matzo. Its crunchy, sweet, nutty and spiced to perfection. And I was really happy to find some amazing gluten free Matzo to go with it.

Ingredients:

5 Diced green apples with peel on (or use your favorite apple)
1/2 Tbs Cinnamon
2 Tbs Honey
2 Tbs Brown Sugar
Juice of One Lemon
1/2 Cup Red Wine
1 Cup Walnut

Dice up all the apples into small chunks and place in a big bowl with lemon juice. Mix together so that all the apples are coated well with lemon. Now I placed about 1/4 of the mix at a time into a food processor and crushed it up a bit more but this step depends on preference. Some people like larger chunks and other like it very fine. Once your done with apples add walnuts to the food processor and crush. Add nuts to the bowl of apples and add all the remaining ingredients. Combine everything together and serve with Matzo.

20130325-095919.jpg

Italian Rainbow Cookies

My favorite cookie as a kid was always the Italian Rainbow Cookies. The fun, sprinkles and choclate all in a cute package. Plus my grandmother loved marzipan and I could never get enough of the sweet almond goodness.
Living in the italian market I am surrounded my amazing baked goods. I wanted to re-creat my favorite gluten free. It came out great on the first try. This is a must have!!!

Ingredients:
Four eggs separated
1 Cup Butter Melted
8-10oz Almond Paste (marzipan)
3/4 Cup Chocolate Chips
A few drops each of blue and red food coloring
1 Cup Sugar

(The original recipe I worked from added 2 cups of almond flour and another half cup butter. I did not use it with my version but may play around with substituting some almond flour for the sugar next next time.

Start by separating eggs into two bowl. Whisk the whites until you get high peeks and place aside. To the bowl with the yolks crumble in the almond paste and mix. To the yolk and almond paste bowl add the melted butter and sugar. Mix very well until all the lumps are gone and mixture is smooth. Now fold in eggs whites and mix carefully.

Now separate this mixture into three bowls as even as possible. Mix a few drops of blue into one bowl, a few drops of red into the other and then leave the remaining bowl untouched.

Line three equally sized rectangular baking pans with wax paper and individually pour one batter into each pan. Bake at 350 degrees for about 15 minutes utile top starts to firm and before sides brown. Remove from oven and allow to cool. After ten minutes use the wax paper to remove each layer and then place them on top of each-other. Now melt the chocolate in a bowl. Spread the chocolate over entire cake with the chocolate so that the entire thing is covered. Allow the whole thing to harden in the fridge. Then slice into square pieces.

Store in fridge and slice as needed. Cake freezes well.

20130414-213519.jpg

20130414-213535.jpg

20130414-213610.jpg

Strawberry Jam

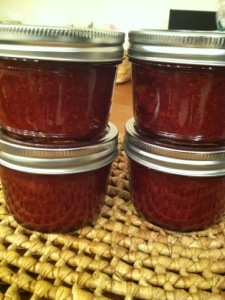
It may not be the season but the market has been filled with strawberries all week. This is a super easy recipe and it came out AMAZING. Best jelly I have done yet. Great in oatmeal, on toast, or yogurt in the morning. Also great with a peanut butter sandwich or as a cookie center.

Ingredients-

4 (1lb) Container’s of Strawberries

2 1/2 Cups Sugar

1 (Lemon Juice and Zest)

4 (8oz Jars)

Rinse and dry all the berries. Then slice them slice them all and place in a large container with a lid. Pour in 1 Cup of the sugar, mix well and place lid on top. Leave in the fridge for 1-3 days. This will quickly break down the berries. Its great recipe because you can by the berries fresh today and it only takes a few minutes to get the first steps done and then you have up to three days to find time to can them.

When your ready set up your three pot Jar making process like below. In the one pot pour in all you strawberries and bring to boil. Add an additional cup and a half of sugar and mix well. Bring to boil and then simmer for about 30 minutes. Until it begins to reduce, hits 220 degrees and passed the glass test on the back of a spoon. Mash the mixture with a potato masher till you get the consistency you are looking for. Now add lemon zest and juice of one lemon. Cook an additional ten minutes. Now your ready to JAR!!!!!

I copy and pasted the method from my orange marm below:

This recipe makes 4 (8oz Jars). Start with the three pot set up below:

Pot 1 –Using the recipe above – In a medium size pot non-reactive surface to make the jam. Continue to stir and watch the mixture so that it continues to bubble but not burn or boil over. You must stir it every few minutes. Your goal is for the mixture to become thick. It should get to the point that it wont create droplets or run easily off a cold spoon. You are looking for a consistency that slowly forms large clumps that look almost like glass forming on the spoon. Many recipes say this will take 10-15 minutes. It took me about 45 minutes but weather plays huge factor.

Pot 2- The next pot should be small with hot water for cleaning the lids. When you preserve anything in jars, the metal circle part of the lid is not re-usable. Each time you must use new lids.This is because they have a rubber lining that helps form a seal but it only works once. The jar and twisty top are good for many uses but not the flat part of the lid. In order to active the new flat top you must heat the lids to help soften the rubber. Do this by putting just the flat part of the lid in the pot with very hot water but not boiling and allow it to sit for about ten minutes before processing.

Pot 3 – Place water into the pot high enough to cover the jars with a little extra water because water will evaporate. You should use the biggest pot you own for this one like a lobster pot. Place a small towel in the bottom of the pot. This acts like a pillow to avoid the jars from breaking in the pot. Place the jars and lids in the pot and bring water to boil. Boil for ten minutes and then keep the jars in the hot water until your ready to fill.

Once the jelly cooks down and is ready to go, shut the heat off and allow it to cool for 5 minutes. Remove jars from hot water and drip dry. Fill each jar with jelly about one half inch from top. Clean the tops of the jar well with a clean wet towel to insure that you will make a good seal between the jar and lid. Place the lids on jars. Its important not to twist the lid on to tight because you want air to escape. A good rule is to make it finger tight.

Next, place the complete jars in the big pot of water on high heat for ten minutes. Once the water is boiling you may want to lower it a bit to keep the jars from moving to much. After ten minutes CAREFULLY remove the the jars with tongs from pot and place on counter. Its important not to put the jars on a cold surface because the sudden change in temp from the hot water to the cold counter can break the glass.

The final step is my favorite. I call it the canning musical. Once jars are out of the water you want to hear each lid make a pop sound. This insures a good seal. The sound is like the what you hear when you open a glass juice bottle. This can take up to 15 minutes depending on room temp. If you don’t hear the pop or see an indent on the top of the lid then you should keep that jar in the fridge and use it first.

Jam can stay shelf stable for up to a year but once opened should be stored in fridge. Enjoy!!!

20130308-113301.jpg

“Hell-o” Fruit Salad

I am giggling while I write that title because if you knew Jay’s mom you would understand why I love this very bubbly, caring and amazing person. Ellen is always super supportive of all my endeavors regardless of what I may be up to. She knows that I take very good care of her son and that normally means feeding him well. Since Ellen was born and grew up in the Philippians I am consistently exposed to new dishes that I would have never tried. Jay often misses his mom’s best dishes and Ellen does her best at sharing the recipes for me to re-create at home. Momma Ellen will always make the best but I am told my replications are pretty good. This is another one of her famous Philippines dishes. We shared it at our Super Bowl party and it was a hit.

Whenever Momma Ellen calls it is customary to say “Hell-o”

Ingredients:

1/2 Can Condensed Sweetened Milk

1/2 Bar Cream Cheese

2 Big Cans Tropical Fruit Salad in Light Syrup

1 Big Can Sliced Peaches in Light Syrup

1 Small Can Little Oranges in Light Syrup

1 Jar Coconut Jelly (Find in Asian Store) Optional*

Start by draining all fruit very well. I placed it in a colander in the sink for 10 minutes. Place cream cheese and condensed milk in food processor or mixer and blend it together until smooth. Pour fruit in bowl and then pour milk mix on top. Mix it all together well and place in fridge for two hours before serving.

ENJOY!!!!!! Thanks Momma …

20130302-062513.jpg

Childhood Banana Pudding

My mom made me this as a kid and it was always one of my favorite treats. It’s a great sweet and healthy ending to any meal.

Ingredients:

2 Banana
3 Tbs Reduce Fat Sour Cream
1 Tbs Sugar
1 tsp Vanilla
1/2 tsp Cinnamon
1 Tbs Sweet Condensed Milk (Optional)

Place all the ingredients in a food processor a blend well until smooth. Pour into two separate small dishes and freeze for about an hour. Serve with cool whip of whip cream on top.

20130226-002027.jpg

Pecan Bread

I have done something similar but this one is a different base that worked out great. Easy gluten free sweet bread for anyone that has no gluten free flour at home. I actually went home for the holidays and needed some type of bread for breakfast and this is what I came up with.

Ingredients:

1 1/2 Cups of crushed Pecans
1/2 Cup Walnuts
5 eggs ( yolks and whites separated)
1 Cup Sugar
1 tsp Cinnamon
1 tsp Nutmeg
1 Pinch Salt
1/2 Tbs Vanilla
1 Tbs Rum
2 tsp Baking Powder

Place the eggs in two separate bowls and whisk both well until light and fluffy. Add sugar to yolks and whisk again. Add spices, salt, vanilla, rum and baking to yolks and mix well. Then add the nuts and mix very well. Return to the egg white and whisk until peaks form. Slowly pour fluff egg whites to the nut yolk mix and carefully incorporate it all with out deflating.

Bake on 350 for about 30 to 35 minutes.

20130105-130932.jpg

20130105-130950.jpg

Addictive Chocolate Burst

I was recently asked to do a Valentines special for a local network. I was having fun coming up with recipes and this one great! Warning it is addictive!

Ingredients:

9 Cups Gluten Free Chex Mix
3 Tbs Butter
1 Cup Chocolate chip’s
2 Cups Powder Sugar
1 Pack Sugar Free Jello Mix ( I used strawberry but any one would work)

Start by melting chocolate and butter in a bowl in the microwave. Pour melted mixture on top of Cereal and mix well very gently. This next step is great for a kid to do. In a large container with lid or a big zip lock bag pour the whole packet of Jell-o mix and all the sugar. Shake the sugar mixture and then add all the chocolate covered cereal. Shake..Shake…..SHAKE! Until every chocolate morsel is covered.

I apologize about the image, this stuff was so good we all ate it to fast to take a picture. Fell free to change up the chocolate type and jello flavor for a fun combo. Like white chocolate and lime, milk chocolate and orange or even raspberry and dark chocolate. Have Fun!

20130103-165955.jpg