Flan

The other night my boyfriend and I where sitting on the coach and he said he was home sick and all he wanted was his mommy’s flan. I was not allowed to look up a recipe or put my own spin on it, I had to get the exact recipe directly from her and no funny business. So, at 10 P.M. my mission started.

EDITED: 12/25/16

Ingredients:

2 Can of condensed milk
1 Can full of water
6 egg yolks
4 whole eggs
1 cup sugar
* vanilla or any extract optional

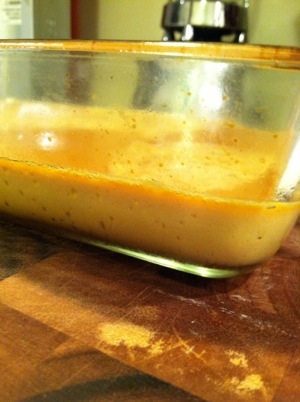
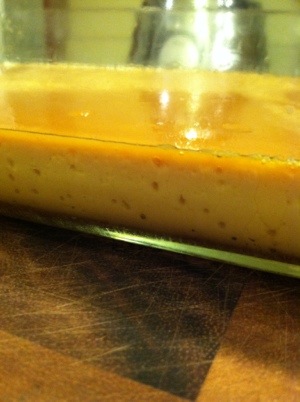
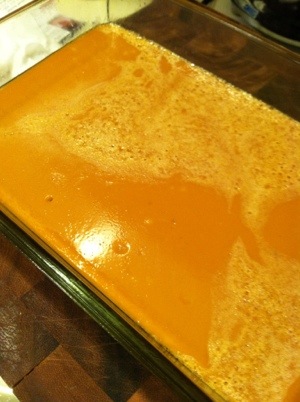
In a large bowl beat eggs very well and then slowly add milk and water and continue to beat and whisk very well. If you have a mixer or blender that might be more very helpful. Blend together the eggs, then separately blend together the milk and water. Slowly add the milk/water mixture to the egg mixture while mixing together.  In a small pan pour in sugar and melt into a syrup. This will take time, but be patient and continue to stir. Keep the pan at a medium heat and keep stirring and you see a caramel form in about five minutes. ( Note: If you over cook the sugar it will start to clump and form crystals. If the heat is to low the syrup will never form and sugar will turn dark and hard. ) Now take the hot syrup and pour it quickly in to a well sprayed baking dish that is the shape that you want the flan to form. Quickly move the sugar around to cover the bottom. This is hard because it will harden quickly, but its fine if its not perfect because it will melt in the oven. Now pour the egg mixture on top of the syrup in the baking dish.

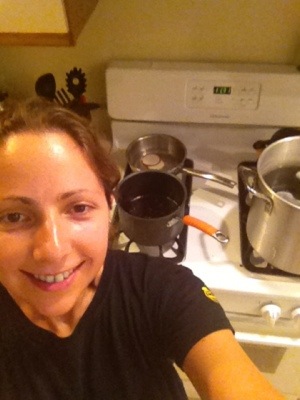
Set up a water-bath. The picture below will show you how I did it. I filled a large baking pan half way up with water and put it on top of a bigger sheet tray to make it easier to hold. Place the baking dish with the flan in the water bath. BE CAREFULLY not to get any water in the dish.

Bake the whole thing at 350 degree for about 1 hour 15 minutes – 1 hour 30 mins. Keep and eye on it because any temp change will change the cooking time. To check the doneness use a tooth pick and see if it comes out clean.

Remove the whole thing from the oven carefully being careful not to get water in the flan. Allow the flan to cool out side a water bath.

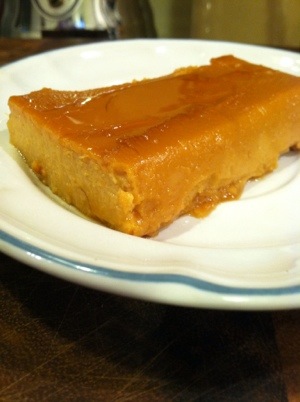
To serve – flip flan onto a flat dish and cut into serving size pieces. Make sure it is completely cooled before flipping.

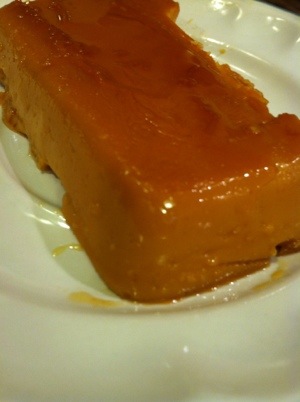
It came out great but it will never be as good as the one Jay’s mom makes. My next attempt will be with unsweetened fat free condensed milk to see if I can make a guilt free version.

20120827-095140.jpg

20120827-095148.jpg

20120827-095157.jpg

20120827-095207.jpg

20120827-095220.jpg

20120827-095231.jpg

BlueBerry Jam

I have started playing around with preserving food in jars. I have failed with my attempts at pickling but I seem to do well with making jam. This recipe is transferable to almost any berry. Please make sure to follow approved canning techniques to insure a safe, shelf stable product. I provided a great link for you with tons more recipes and resources if your interested:http://nchfp.uga.edu/publications/publications_usda.html

If you are from Philly then you have most likely been to one of the many great brunch places with homemade jam. I have been wanting to replicate it for a long time but was finally inspired when the market had a full flat of blueberries for $2. I adjusted the recipe’s I had by adding less sugar and no pectin. This was my first try and it came out great!!!!

Ingredients:

5 Cups blueberries (Washed, dried, stems removed)
1 1/2 Cups Sugar
Juice and zest of one lemon

I recommend reading the site I provided above for some better canning instruction but I will try to break it down below. I have taken some canning classes on canning and I can imagine it would be hard to follow with out understanding the reason behind each step. This recipe was a small batch and made 3 small jars worth. Start with the three pot set up below:

Pot 1 – Medium size pot non-reactive surface to make the jam. Place blueberries in the pot and crush. Add sugar and lemon and cook on medium heat. Continue to stir and watch the mixture so that it continues to bubble but not burn or boil over. You must stir it every few minutes. Your goal is for the mixture to become thick. It should get to the point that it wont create droplets or run easily off a cold spoon. You are looking for a consistency that slowly forms large clumps that look almost like glass forming on the spoon. Many recipes say this will take 10-15 minutes. It took me about 35 minutes but weather plays huge factor.

Pot 2- The next pot should be small with hot water for cleaning the lids. When you preserve anything in jars, the metal circle part of the lid is not re-usable. Each time you must use new lids.This is because they have a rubber lining that helps form a seal but it only works once. The jar and twisty top are good for many uses but not the flat part of the lid. In order to active the new flat top you must heat the lids to help soften the rubber. Do this by putting just the flat part of the lid in the pot with very hot water but not boiling and allow it to sit for about ten minutes before processing.

Pot 3 – Place water into the pot high enough to cover the jars with a little extra water because water will evaporate. You should use the biggest pot you own for this one like a lobster pot. Place a small towel in the bottom of the pot. This acts like a pillow to avoid the jars from breaking in the pot. Place the jars and lids in the pot and bring water to boil. Boil for ten minutes and then keep the jars in the hot water until your ready to fill.

Once the jelly cooks down and is ready to go, shut the heat off and allow it to cool for 5 minutes. Remove jars from hot water and drip dry. Fill each jar with jelly about one half inch from top. Clean the tops of the jar well with a clean towel to insure that you will make a good seal between the jar and lid. Place the lids on jars. Its important not to twist the lid on to tight because you want air to escape. A good rule is to make it finger tight.

Next, place the complete jars in the big pot of water on high heat for ten minutes. Once the water is boiling you may want to lower it a bit to keep the jars from moving to much. After ten minutes CAREFULLY remove the the jars with tongs from pot and place on counter. Its important not to put the jars on a cold surface because the sudden change in temp from the hot water to the cold counter can break the glass.

The final step is my favorite. I call it the canning musical. Once jars are out of the water you want to hear each lid make a pop sound. This insures a good seal. The sound is like the what you hear when you open a glass juice bottle. This can take up to 15 minutes depending on room temp. If you don’t hear the pop or see an indent on the top of the lid then you should keep that jar in the fridge and use it first.

Jam can stay shelf stable for up to a year but once opened should be stored in fridge. Enjoy!!!

20120817-083022.jpg

20120823-153051.jpg

Quick Coconut Ice Cream

I am always trying new ice-cream creations. I try to always make it healthy and low fat. This one worked out better then most. It Is lite, fluffy and great for summer. Best of all I came up with some great tricks to make it really easy.

Ingredients:

2 Cups skim milk
2 Tbsp fat free halt and half
5 Tbsp shredded coconut
1 tsp vanilla extract
4 Tbsp Splenda
1/2 tsp salt

Put all the ingredients in a quart size container with lid. Shake ingredients well for a few minutes. This will form a nice foam on the top. You can taste the mix at this point to make sure it is as sweet as you want. Place the mix in the ice cream maker and let it go for about 25 minutes or until it is completely frozen. Eat is right away and enjoy.
For a fun spin, what ice cream is almost done, slowly add some chocolate chips and chopped almonds for an almond joy version.

20120817-082931.jpg

20120817-082947.jpg

Peanut Butter & Company

Peanut Butter is clearly one of my go-to snacks and ingredients. Low in carb and high in protein it’s hard to go wrong. I often find my self substituting Peanut Butter when butter is required in recipes both sweet and savory.

Peanut Butter & Company is a great company that makes tons of fantastic flavors and all gluten free. They sent me a whole bunch of diffrent flavors to play with and I have come up with some great stuff. Give one of the flavors a try and keep a look out for some great recipes soon to come.

Some of natural peanut butter’s health benefits are:

– Vegetarian source of protein
– Provides essential vitamins and minerals like Vitamin E, Niacin, Phosphorous & Magnesium
– Cholesterol Free
– No trans fat
– Good source of natural folic acid, an essential nutrient during pregnancy and in the prevention of heart disease
– Good source of antioxidant, offering as much as grapes, tomatoes, or blueberries

At Peanut Butter & Co. they pride themselves on providing great-tasting, all-natural, healthful products. The complete ingredients list and nutritional information for all of thier peanut butter products are available on the web site.

Check them out!!!

20120808-163456.jpg

20120808-164651.jpg

Blondies

Looking to make something sweet but don’t want junk food sitting around? What would you say if I could make a Blondie with no flour, no egg and no butter but only a can of beans and a few simple ingredients?

Try using the White Chocolate Peanut Butter from Peanut Butter Company’s White Chocolate Peanut Butter to really make this recipe really something special.

Ingredients:
1 Can of white beans (drain and rinse)p

2 TBS of your favorite peanut butter ( I recommend a fun flavor like the White Chocolate from New York Peanut Butter Company)
1/4 Splenda or any sweetener you would prefer
1 tsp vanilla
1 1/2 tsp baking soda
1/2 cup quick oatmeal

This recipe is really easy. Put all the ingredients in a food processor and blend well.
Spray a loaf pan with non-stick spray and pour in batter. Bake at 350 degrees for about 20 minutes. Let it cook and then cut into squares.

*Since the recipe has no egg feel free to taste for sweetness and adjust how you would like.

20120804-112427.jpg

Carrot Halvah

My love for carrots with never end, I have been addicted since I was little. I make juice, bread, cake and even pasta with them. I have even been told that I have turned slightly orange form the large amount of carrots I can eat in a week. I was introduced to this desert at a great Indian wedding. Its could be compared to a carrot pudding.

Ingredients:

2 lbs Carrots
2 Tbsp oil of any kind
2 Tbsp light butter (earth balance if vegan)
1 tsp salt
1 Tbsp honey
1/4 cup Splenda
1/3 cup brown sugar
1 tsp Cinnamon
1/2 cup yellow raisin
4 Tbsp walnut meal or any crushed nuts you have around
1/2 Tbsp corn starch

The first step is to grate carrots fine. This can be done with a hand grater or simply in a food processor. Place carrots in pan with oil and sauté on low until carrots begin to become translucent. Adding the butter a few minutes into cooking. It’s important to watch them and not to let the carrots brown. Next, add the almond milk, sugar, cinnamon, cardamom, corn starch and salt. Allow the mixture to simmer low for at least 30 minutes string occasionally. The mixture will begin very liquid but the goal is to have it reach a rice pudding like consistency. After 30 minutes add half the walnut meal, all the raisins and continue to cook for about 10 more minutes or until desired consistency is reached. When complete, allow to cool and serve with remaining walnut meal.

20120728-182718.jpg