The good stuff does not get much easier then this. This recipe works like magic and its so good and healthy I cant stop eating it all. Great way to save any extra apples you have from apple picking this season. Plus a jar of this stuff will be great gift during the holidays.
Ingredients:
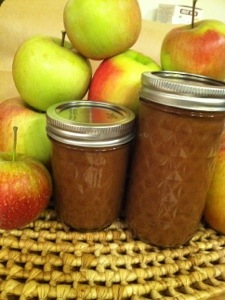
5 Large Apples
2 tsp Cinnamon
Juice 1 Lemon
*Optional tsp pumpkin spice
* Optional Sugar (I did not use any)
Cuts the large apples into sections. Keep the peels on because it is what adds the color and constancy to the final product. Place all the apples in a large slow cook. Add lemon and spices and mix. Turn the slow cooker on low for 6 hours. After the 6 hours stir lightly and the apple magically become a butter pure. No need to mash or anything. Return the lid and cook for another few hours. Once you have the color you want, remove from heat and allow to cool. Then place the whole mixture in a blender to blend till you have a smooth butter.
From here I put it into jars and continued with my normal jar preserving process. You could just leave it in the fridge and you will have about 3 weeks on it. Butter will become much more firm in the fridge regardless of preserving it or not.
I copy and pasted my preserving process below.
This recipe was a small batch and made 3 small jars worth. Start with the two pot set up below:
Pot 1- The next pot should be small with hot water for cleaning the lids. When you preserve anything in jars, the metal circle part of the lid is not re-usable. Each time you must use new lids.This is because they have a rubber lining that helps form a seal but it only works once. The jar and twisty top are good for many uses but not the flat part of the lid. In order to active the new flat top you must heat the lids to help soften the rubber. Do this by putting just the flat part of the lid in the pot with very hot water but not boiling and allow it to sit for about ten minutes before processing.
Pot 2 – Place water into the pot high enough to cover the jars with a little extra water because water will evaporate. You should use the biggest pot you own for this one like a lobster pot. Place a small towel in the bottom of the pot. This acts like a pillow to avoid the jars from breaking in the pot. Place the jars and lids in the pot and bring water to boil. Boil for ten minutes and then keep the jars in the hot water until your ready to fill.
Once the butter is blended well you can start the process. Remove jars from hot water and drip dry. Fill each jar with apple butter about one half inch from top. Clean the tops of the jar well with a clean towel to insure that you will make a good seal between the jar and lid. Place the lids on jars. Its important not to twist the lid on to tight because you want air to escape. A good rule is to make it finger tight. It will not open in the water because the lid forms a seal. As simple as this is many people really destroy what they make by not following this step.
Next, place the complete jars in the big pot of water on high heat for ten minutes. Once the water is boiling you may want to lower it a bit to keep the jars from moving to much. After ten minutes CAREFULLY remove the the jars with tongs from pot and place on counter. Its important not to put the jars on a cold surface because the sudden change in temp from the hot water to the cold counter can break the glass.
The final step is my favorite. I call it the canning musical. Once jars are out of the water you want to hear each lid make a pop sound. This insures a good seal. The sound is like the what you hear when you open a glass juice bottle. This can take up to 15 minutes depending on room temp. If you don’t hear the pop or see an indent on the top of the lid then you should keep that jar in the fridge and use it first.
Now I have apple butter all season and some great gifts. Goes great in yogurts, on toast or on top of pork chops 🙂
Enjoy!!!!